

A Good House Begins Before Construction Starts
Building a residential house is one of the biggest investments a family makes. Most homeowners focus on the elevation, flooring, paint colours and interior design, but the decisions made before construction often have a greater impact on comfort, durability and future maintenance.
A beautiful house can still become inconvenient if the bedrooms cannot accommodate the planned beds, the kitchen has insufficient working space, the roof traps excessive heat, or the plumbing system cannot maintain reliable water pressure. Similarly, inadequate curing, poor waterproofing and unplanned electrical wiring can lead to expensive repairs.
The solution is to prepare a detailed plan before work begins. These Home Construction Planning Tips cover 20 important considerations, from structural safety and water resources to furniture dimensions, roof height and final finishing. Use them as a planning checklist and adapt the design to your plot, family needs, local building rules and budget.
1. Get the Soil Tested Before Designing the Foundation
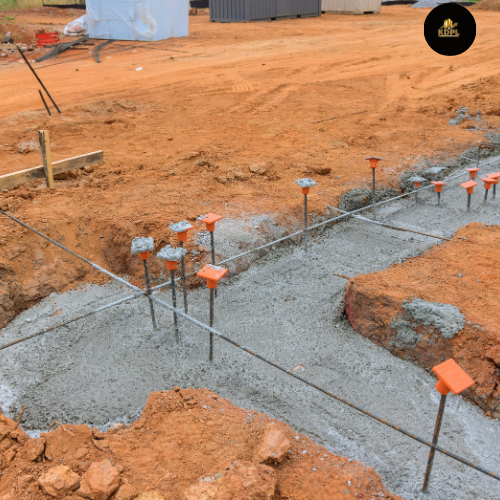
Never finalise a foundation based only on the appearance of the plot or a nearby house’s construction. Two adjacent properties can have different soil conditions, groundwater levels and load-bearing characteristics.
A suitable geotechnical investigation helps the engineer understand the soil profile and recommend an appropriate foundation. The number of floors, structural loads, nearby buildings and site conditions must also be considered.
What to do: Arrange soil investigation when required, share the results with a qualified structural engineer, and obtain foundation drawings before excavation. Do not allow a contractor to change foundation depth or reinforcement without engineering approval.
2. Plan the Structural System for Safety and Future Needs
Columns, beams, slabs, foundations and reinforcement work together to carry the building’s loads. Their dimensions cannot be safely chosen using a generic online chart.
If you may want another floor in the future, tell the architect and structural engineer before construction. Future expansion must be designed into the structural system from the beginning, subject to applicable approvals and site conditions.
Check reinforcement placement, concrete specifications, cover, formwork and embedded services before concrete is poured. Concrete strength depends on proper materials, batching, placement, compaction and curing.

3. Secure a Reliable Water Supply Before Finalising the Layout

Water availability should influence the location of bathrooms, kitchens, utility areas, overhead tanks and plumbing routes.
Identify the permitted water source, municipal supply arrangements, expected availability and storage requirements. If groundwater extraction is being considered, check local permissions and groundwater conditions rather than assuming a borewell will always provide sufficient water.
Calculate the family’s likely daily demand with the help of a plumbing professional. Size storage tanks according to supply reliability, household occupancy and local requirements. An oversized tank can add unnecessary cost and structural load, while an undersized tank can cause frequent shortages.
Plan access for cleaning tanks and servicing pumps. Include suitable overflow arrangements and ensure stored water is protected from contamination.
4. Design Rainwater Harvesting and Drainage Early
Rainwater harvesting is easier to incorporate when roof slopes, downpipes, open areas and underground services are planned together.
Depending on the site and local rules, rainwater may be collected for storage or directed through an appropriate recharge system. The system needs suitable filtration, safe overflow and maintenance access. Do not connect roof rainwater to the drinking-water supply without an appropriate treatment and separation arrangement.
Also plan the site’s surface drainage. Water should not collect near foundations or flow into neighbouring properties. Final ground levels, entrance levels and drain locations should be decided before paving and landscaping.

5. Establish the Right Room Sizes Before Construction

Room dimensions should reflect how the space will actually be used. A room that appears large on an empty floor plan may feel cramped after the bed, wardrobes and doors are installed.
As preliminary planning references, a bedroom might be around 10 × 10 ft or larger, while a living room may need approximately 12 × 14 ft depending on the furniture and circulation requirements. These are examples, not universal minimums; local rules and the actual layout must determine acceptable dimensions.
Draw furniture on the floor plan before approving room sizes. Check whether people can walk comfortably around the furniture and whether doors can open without hitting beds, chairs or cabinets.
6. Decide Furniture Sizes Before Fixing Windows and Doors
Furniture planning should not be postponed until after plastering. A standard double bed may be approximately 5 × 6.5 ft, while a larger bed can occupy more space. Wardrobes commonly need substantial depth for hanging clothes, and a study desk requires both working surface and chair clearance.
Measure the actual furniture you intend to purchase, especially large beds, sofas, dining tables, refrigerators and wardrobes. Allow enough room to move around them.
Check that bedroom doors do not clash with wardrobes, bathroom doors or bedside tables. Ensure window locations do not leave wardrobes blocking daylight or prevent curtains from opening properly.
Practical trick: Print the floor plan to scale and mark furniture footprints. If possible, use tape on the floor of an existing room to understand how much space the proposed arrangement will occupy.
7. Choose Door Sizes and Locations Carefully
Door dimensions depend on the room, accessibility needs, frame type and local requirements. As a preliminary residential reference, many internal doors are around 2 ft 6 in to 3 ft wide, while main entrances may be wider. Bathrooms often require careful planning for usable opening width and safe access.
Confirm the finished opening size with the door supplier before masonry openings are fixed. Account for the frame, flooring thickness and installation tolerances.
Avoid placing a door where it blocks a passage or collides with another door. Consider accessibility for older family members, children and anyone who may need mobility assistance.
8. Position Windows for Daylight, Ventilation and Privacy
Windows influence comfort, natural light, ventilation, energy use and the overall appearance of a house. Their size and position should respond to the direction of sunlight, nearby buildings, privacy needs and the room’s function.
In hot regions, excessive direct afternoon sun can increase indoor heat. Shading, suitable glazing, external projections and cross-ventilation can improve comfort when designed for the site’s conditions.
Plan window openings alongside furniture layouts and electrical points. A large window should not be blocked by a wardrobe, and curtains should not interfere with an air conditioner or opening shutters.
Use suitable weather seals, sill slopes and flashing details to reduce rainwater penetration.
9. Set Roof Height According to Comfort and Local Rules
Ceiling height affects how spacious a room feels, how air circulates and how much heat accumulates indoors. However, simply increasing the height is not always the best solution because it can increase wall costs, cooling requirements and finishing expenses.
Choose the finished floor-to-ceiling height according to local building regulations, climate, room use and the architectural design. Confirm whether the drawing dimension refers to the structural slab or the final finished ceiling.
For hot climates, combine appropriate ceiling height with roof insulation, shading, ventilation and a suitable roof finish. An insulated roof may improve comfort more effectively than height alone.

10. Select Roof Waterproofing and Heat Protection Before the Slab
The roof is exposed to sun, rain and temperature changes. Poor slopes, blocked outlets, weak waterproofing and badly detailed pipe penetrations can cause leakage and ceiling damage.
Plan the roof’s drainage falls, rainwater outlets, waterproofing system and access for maintenance before construction. Coordinate solar panels, water tanks, pipes and outdoor equipment with the structural engineer so their loads and mounting details are properly considered.
Where heat is a concern, evaluate insulation, reflective roof treatments or other suitable roof systems. Follow the product specifications and ensure the system does not obstruct drainage.
11. Never Skip Concrete Curing

Curing helps concrete retain sufficient moisture and temperature conditions for cement hydration and strength development. Poor curing can contribute to reduced durability, surface cracking and other defects.
The curing method depends on the concrete element, weather and approved specification. Common methods include ponding on suitable slabs, continuous moist coverings and controlled water curing. A curing compound may be suitable in certain situations if it is compatible with the next construction layer.
For ordinary concrete, a seven-day curing period is often used as a minimum reference in common practice, but the required duration depends on the cement type, exposure, specification and applicable standards. Do not assume every element has identical requirements.
Keep a curing record and ensure the contractor protects fresh concrete from premature drying, heavy loads and impact.
12. Check Cement, Sand, Aggregate and Steel Quality
Do not select materials on price alone. Cement should be stored dry, sand should be suitable for its intended use, aggregate should meet the specified grading and cleanliness requirements, and steel should match the structural specifications.
Ask for invoices and product details. Reject damaged or contaminated materials where they do not meet the specified requirements.
Concrete mix proportions must follow the approved design or specification. Do not allow workers to add excessive water simply to make concrete easier to pour, and never change reinforcement details without professional approval.
13. Plan Electrical Wiring Before Plastering
Electrical planning should start with a room-by-room appliance list. Identify locations for lights, fans, switches, sockets, air conditioners, refrigerators, washing machines, geysers, water pumps and other major loads.
A qualified electrician should design appropriate circuits, cable sizes, earthing and protective devices. Wet areas require particular care, and electrical equipment must be suitable for its location.
Install conduits and boxes before plastering, inspect them and photograph concealed routes. Avoid leaving wiring joints hidden in inaccessible locations. Keep distribution boards accessible and label circuits clearly.
14. Finalise Plumbing and Drainage Routes in Advance
Plan water supply, hot-water lines where required, soil pipes, waste pipes, vents and cleanouts before closing walls or laying floors.
Check that bathrooms and kitchens have suitable drainage falls and that plumbing routes do not clash with beams or structural elements. Never cut structural members to accommodate a pipe without engineering approval.
Test concealed water supply pipes and drainage connections before covering them. Provide access to valves and serviceable components so routine maintenance does not require breaking tiles or plaster.
15. Waterproof Bathrooms, Balconies and Wet Areas
Waterproofing failures can damage plaster, paint, ceilings and even neighbouring rooms. The system should be selected for the location and installed according to the manufacturer’s instructions.
Pay attention to floor-wall junctions, shower areas, pipe penetrations, balconies and terraces. Complete the required curing and water-retention or flood test before installing protective layers and tiles.
Bathroom floors must slope toward the drain. Confirm the finished floor levels at the doorway to reduce water escaping into adjoining rooms.
16. Choose Flooring According to Use, Not Appearance Alone
A glossy tile may look luxurious but can become slippery when wet. Matte or textured surfaces may be more suitable for bathrooms, balconies and utility spaces, provided they can be cleaned effectively.
Consider the room’s use, expected traffic, maintenance requirements, tile dimensions and installation method. Large-format tiles require suitable substrate flatness and compatible adhesive.
Check tile batches and shades before installation, plan the joint layout, and retain spare tiles for future repairs. Do not use tiles to hide major floor-level problems.

17. Plan Kitchen Storage and Appliance Positions
The kitchen should be designed around the cooking routine. Finalise the refrigerator, sink, hob, chimney, preparation counters and storage zones before plumbing and electrical work.
Keep sufficient counter space between washing and cooking areas. Ensure refrigerator and cabinet doors open fully without blocking the main passage. Plan dedicated sockets for appliances according to their electrical requirements.
If Vastu is important to your family, consider traditional preferences where practical, but do not compromise ventilation, fire safety or efficient workflow to achieve a particular direction.
18. Design Staircases for Safe Everyday Movement
A staircase must be comfortable, well-lit and compliant with applicable building requirements. Tread depth, riser height, width, headroom, landings and handrails should be calculated by the designer rather than improvised on site.
Check the available staircase space before finalising the floor plan. A staircase that is too steep or has inconsistent steps can become dangerous, particularly for children and older adults.
Provide adequate lighting and avoid placing doors or furniture where they obstruct the landing. For a house with future accessibility needs, discuss whether a ground-floor bedroom and bathroom should be included.
19. Plan Natural Light, Ventilation and Energy Use
House orientation, shading, window placement and room arrangement influence indoor comfort. Consider where the morning and afternoon sun falls, how air moves through the house and which rooms require privacy.
Provide appropriate ventilation for kitchens and bathrooms. Use energy-efficient lighting and appliances where suitable, and plan solar-panel provision early if you may install a system later.
A well-designed home balances daylight with glare and heat gain. Larger windows are not automatically better if they make the room uncomfortable or increase cooling costs.
20. Prepare a Detailed Budget, Timeline and Inspection Plan
Before construction starts, prepare an itemised bill of quantities, material specifications, drawings, payment schedule and written agreement with the contractor.
Separate structural work, masonry, services, waterproofing, flooring, doors and windows, painting and external development in the budget. Keep a contingency allowance for genuine unexpected costs, and record every design change with its financial impact.
Inspect the work before it becomes hidden: reinforcement before concrete, pipes before plastering, waterproofing before tiling, and electrical installations before energising. Maintain a record of invoices, tests, warranties, photographs and approved drawings.
Conclusion: Plan the Details Before They Become Expensive Problems
A successful home is created through coordinated decisions, not just attractive design. Soil testing, structural safety, reliable water resources, correct curing, furniture dimensions, roof protection, wiring, plumbing and waterproofing all affect the comfort and long-term performance of the building.
Use these 20 points as a starting checklist, then review them with your architect, structural engineer and qualified service professionals. A little more planning before construction can prevent unnecessary demolition, avoidable expenses and frustrating repairs after moving in.
Frequently Asked Questions
1. What should I plan first before building a house?
Start with the plot survey, applicable permissions, soil investigation where required, family requirements, architectural layout, structural design and preliminary budget. Finalise these before beginning construction.
2. Why is soil testing important for a residential building?
Soil testing helps the engineer understand ground conditions and design an appropriate foundation. It reduces the risk of relying on unsuitable assumptions about soil strength or groundwater.
3. How should I plan water resources for my house?
Estimate household demand, confirm the permitted supply source, size storage appropriately and plan pumps, plumbing, rainwater harvesting and drainage. Provide safe access for tank cleaning and maintenance.
4. How long should concrete be cured?
Seven days is a common minimum reference for ordinary concrete in many situations, but the required duration depends on the specification, cement type, weather and exposure. Follow the engineer’s curing plan.
5. Should furniture sizes be decided before construction?
Yes. Planning beds, wardrobes, sofas, dining tables and appliances early helps determine room dimensions, door swings, window locations, sockets and circulation space.
6. What is the ideal ceiling height for a house?
There is no single ideal height for every house. It should satisfy local rules and suit the climate, room proportions, ventilation strategy and budget. Confirm the finished ceiling height rather than only the slab level.
7. When should electrical and plumbing work be planned?
Plan routes and fixture locations during the design stage. Install and inspect concealed services before plastering or covering them, and complete the required tests before the systems are put into service.
8. Is roof waterproofing necessary even if the roof is sloped?
Yes. A slope helps drainage but does not replace a suitable waterproofing system and correctly detailed joints, outlets and penetrations. Inspect and maintain the roof regularly.
9. How can I reduce future house maintenance costs?
Use suitable materials, provide access to serviceable components, complete waterproofing correctly, protect concrete through proper curing and maintain records of concealed pipes and wiring. Avoid cutting corners on safety-critical work.
10. What documents should I keep after construction?
Keep approved plans, structural drawings, service layouts, material invoices, waterproofing and plumbing test records, electrical test documentation, warranties, maintenance instructions and photographs of concealed services. These records make future repairs and alterations easier.